Contact Printing
A contact print is a print the size of a negative. A contact print from a 35mm negative measures 1"x1.5".
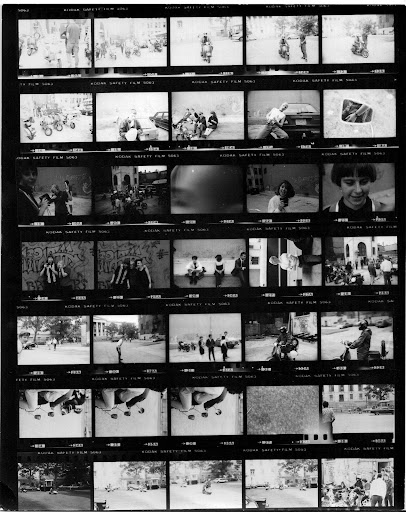
A contact sheet is a large sheet of paper, usually 8"x10" or 8.5"x11", containing a series of contact prints.
"Contacts" are best used as proof sheets. An entire roll of film is contact-printed onto one single sheet of paper. Each contact print is then examined for its value, and only those that look promising need be individually printed, saving much time and money (in wasted chemicals and printing paper).
Contact sheets also provide a useful way to file work by numbering rolls of negatives to correspond to each contact sheet. The back side of a contact sheet can also be used to store additional information, such as where, when or how the pictures were taken, which you have been noting and keeping track of as per the assignments.
To make a contact print:
1. Position the enlarger housing near the top of its post, so it projects a wide circle of light when turned on. The aperture setting is optional; start with f8.
2. Place a fresh sheet of 8" x 10" printing paper, emulsion side up at the base of the enlarger. (remember how to tell emulsion if you cannot tell from sight- get a finger tip wet, the sticky side will be the emulsion side). Do not use an easel.
3. Position several strips of negatives emulsion side down in rows on the paper.
4. Gently lower a clean sheet of glass over both the negatives and paper to hold them flat and tight together.
5. Turn on the enlarger for a predetermined period of time. Try f 8 at 8 seconds. Aim for a good "overall" exposure as some negatives will print light, and others too dark.
6. Once exposed, process the contact sheet like we did with the photograms, or any other print. If the contact is too dark, lessen the exposure, conversely if it is too light, increase the exposure time.
Understanding the Negative
A negative image is a total inversion of a positive image, in which light areas appear dark and vice versa. When picking an image to print, look at the negative. From the bracketing assignment you should have an idea of what different exposures can look like in negative form. We want you to print from negatives with the most "information" available. A negative that is very dark and opaque is referred to as being "thick" which means it has lots of information and may have been over exposed, over developed or both. A negative that is very transparent is referred to as being "thin" meaning it does not have very much information from being under exposed, underdeveloped or both. The best negatives have all the information there so you can choose what you would like to make viewable. If you bracketed and the negative which had the most information was not at the "normal" light meter reading you should adjust your ISO (film speed to reflect this)
For example:
If you shot 3 frames with an ISO of 400. The first frame was exactly as the meter read, the second was under and the third was over (each by a stop)), we would look to see which negative had the most available information. If your first negative from each image was it, keep shooting at an ISO of 400. If your second image was underexposed by a stop and looked the best, keep using 400 speed film, but make your ISO setting read 200. This acts similarly to halving a stop or underexposing by a stop. Alternatively, if your third frame was over exposed by a stop and looked the best, you would continue to use 400 speed film but set your ISO and set your camera settings to the normal meter readings with the new ISO.
Getting Ready to Enlarge
The negative is positioned in a negative carrier, which fits into the enlarger below the condenser or diffuser. most carriers are two pieces of metal or plastic that hold negatives flat and in place. The carrier has a cut-out the size and format of a negative.
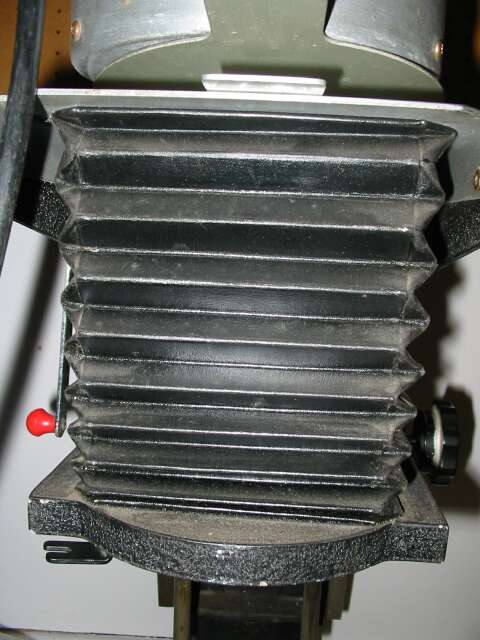
A Bellows is located under the negative carrier. It is used to focus the image. As the bellows is expanded or contracted, the lens moves closer to or farther from the baseboard until the image is sharp.
As the enlarger housing is moved up the post away from the baseboard, the projected image size is increased. As it moves down, the image becomes smaller.
Enlarging lens. An enlarging lens works somewhat like a camera lens to focus the image and control the light. The lens must be matched to the size of the negative being enlarged. All camera and enlarging lenses have a certain covering power, that is , the amount of even illumination that a lens projects. Like camera lenses, enlarging lenses are classified according to their maximum aperture. An f 4 enlarging lens allows more light through it than an f 5.6 enlarging lens. More light means the the images will be easier to see and focus.
Focusing magnifier or grain finder. A focus magnifier enlarges the projected image to facilitate more accurate focusing. The image can be focused without a magnifier, but the results are less likely to be sharp. A grain finder enlarges the grain patterns of the projected negative, allowing even easier accurate focusing.
Easel. An easel holds printing paper flat and in place under the enlarger. It consists of two parts: a base on which the paper is laid and positioned, and a hinged top piece with a crossing metal "blades" to hold the paper flat. The desired image size of the print is set by adjusting the metal blades along a ruled molding on the edges of the top piece of the easel.
Making a print requires a variety of judgements and interpretations, much more so than when developing a roll of film. What follows are the basic printing steps, along with discussion of some of the judgement areas.
Setting Up The Negative
1. Put a strip of negatives in the negative carrier, with the negative to be printed framed by the cut-out section. The negative needs to be positioned with its emulsion side (the dull/matt surface) down (shiny side up!) or the print will have the wrong orientation- basically, it'll be backwards.
2. Use a blower or brush to remove dust that might have accumulated on either side of the negative.
3. Close the carrier, and fit it tightly in place in the enlarger housing.
4. Set the easel for the approximate images size for the print. the image size is the size of the printing paper minus the borders. For example, a 7.5" x 9.5" size image on an 8" x 10" sheet of paper has a 1/4" border all around. The easel has size scales on it's top and sides for setting the image size.
5. Place the easel on the base of the enlarger.
6. Turn on the safe lights, and turn off the room lights.
7. Turn on the enlarger. The enlarger will project the negative image down to the easel.
8. Open the aperture of the enlarging lens to its widest f-stop in order to project enough light to see the image clearly. Now the size of the image must be set and the negative focused.
9. To set the image size, move the enlarger housing up and down on its post. The position of the easel on the enlarger base will need to be adjusted until the projected image is framed tightly by the easel blades. As the housing moves up the post, the projected image becomes larger; as it moves down, the image becomes smaller. Once the desired image size is set, lock the housing in place on the enlarger post.
10. Once the image size is set, focus the negative by turning the focusing knob to expand tor contract the bellows. The image size will need minor adjustment at this point, and the easel may need to be moved around. Adjust the size first, then the focus and easel location. Keep readjusting until the projected image is the correct size and in focus. Make sure to use a piece of the paper you are printing on to focus on as the slightest distance change will affect the critical focus.
Making a Test Strip
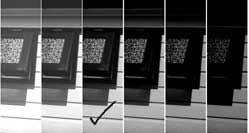
A test strip is a section of printing paper with several different exposures made from a single negative. It is simple to make and can save much time and money on wasted printing paper and chemicals.
To make a test strip:
1. Close down the lens aperture from it's wide-open position. Any f-stop can be used for printing, but the middle stop f 8 is a good starting point.
2. Take out a sheet of printing paper from its box. When opening the box make sure that no light other than safelight hits the paper. Lights from mobile phones, ipods, other people enlarging, enlarger light leaking from the negative area are all problematic. Make sure to close your box and keep your paper safe.
3. Cut the sheet of printing paper into 9 smaller rectangles. Only one will be needed, place the rest back in the box right away for future tests.
4. Lay the strip of paper in the easel, emulsion (shiny/sticky) side up. Figure out where the most important part of your image is, and with the most range of tonality, and try to place your test strip in that part of the frame.
5. Set your timer to 4 seconds. It is an arbitrary starting point as exposure times can vary widely.
6. Switch on the timer and expose the entire stripe for 4 seconds.
7. Change your timer to 2 seconds.
8. Use and opaque piece of cardboard to cover a bottom segment of paper.
9. Switch on the timer and expose the uncovered area of the strip for that time. If the timer is not properly functioning use the second hand of the clock in the darkroom, and switch the enlarger on and off manually. This will work, but it will provide less consistent exposure times than an enlarging timer.
8. Move the cardboard, taking care not to move the strip of paper or the easel along with it. Leave another part of the paper uncovered and expose this.
9. Move the cardboard and repeat the exposure process until there is no more paper left. Previously exposed sections will continue to receive additional amounts of exposure.
Viewing the Test Strip
Now the test strip has a latent image with different exposure times starting at 4 seconds, 6, 8, 10, and so on. Once developed, the test strip should provide a good guide to the required print exposure for that particular negative.
The finished test strip will have a range of exposures; some may be light and some dark. If all exposures are too light or too dark, make another test strip. The ideal strip is dark on one end and light on the other.
If the entire strip is too dark, cut back the exposure. Either close down the lens- try f 11.
If the test strip is too light, increase the exposure, open the lens to f 5.6
* Once we begin using fibre paper, the prints will have a "dry-down" affect. Which means the prints will darken when they have dried. This is not the case with gross RC paper.
If you find that a strip of 10 seconds looks a little light and your strip of 12 seconds is a little dark, set your timer to print at 11 seconds and your image should come out looking the way you want.
If you have a strip that looks good but has an exposure time of less than 8 seconds close down the lens by a stop and double the time:
ex: an exposure of 5 seconds at f 8 would be better if it were 10 seconds at f 11 (this will be explained in further detail next week when we deal with burning and dodging). Alternatively, if there is a very long exposure, lets say 24 seconds at f 8, open up your enlarging lens one stop and halve the time;12 seconds at f 5.6.
Once you have determined the correct exposure settings, it's time to make a print!
.


No comments:
Post a Comment