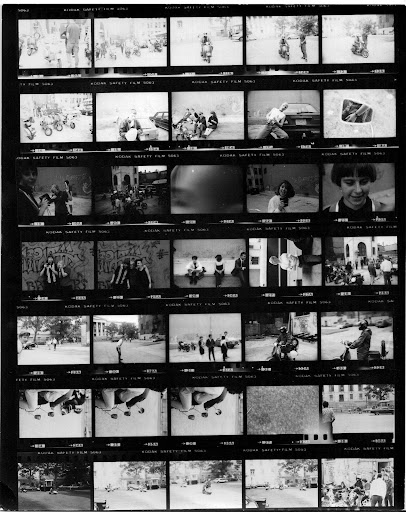
Wednesday, November 24, 2010

Week 3 Assignment Due week 4


Expose 1 roll of film; HP5 36 exp. of people you are either attracted to or repulsed by  in natural light/day light. 
Please experiment with framing and depth of field, and shutter speeds. We do not need to see their face, nor do you need to reveal which applies to the person and how. You do not need to photograph 36 different people, you can, or you can photograph only one person, or a range. The point is to make 36 different pictures with human form in it- interpret this how you will, creativity will get you a gold star for the day. It is to get you excited about your subject and that 'feeling' will be reflected in your images. 

Note all camera settings for each exposure.

After exposure develop this film. Give yourself enough time so it is dry while you make the 4 remaining enlargements to bring into next class for a critique. You may use the enlargements you made in this week's class but you must have a total of 5 good prints from different negatives. When done enlarging, contact print the negatives processed.

Next week you need to bring for Critique:

5 enlarged prints made from either or both of the first two assignments. Write exposure time and  f stop on back of print before developing - in pencil. 
3 rolls of film, exposed according to the assignments, processed and sleeved
3 contact prints of each roll of film, with camera settings written down
We will be discussing your prints, next class for technical issues as well as helping you pick more pictures to consider, and ways to make the images you want to make for artistic quality. 


Week 3. Notes

Contact Printing

A contact print is a print the size of a negative. A contact print from a 35mm negative measures 1"x1.5".
A contact sheet is a large sheet of paper, usually 8"x10" or 8.5"x11", containing a series of contact prints.
"Contacts" are best used as proof sheets. An entire roll of film is contact-printed onto one single sheet of paper. Each contact print is then examined for its value, and only those that look promising need be individually printed, saving much time and money (in wasted chemicals and printing paper).
Contact sheets also provide a useful way to file work by numbering rolls of negatives to correspond to each contact sheet. The back side of a contact sheet can also be used to store additional information, such as where, when or how the pictures were taken, which you have been noting and keeping track of as per the assignments.


To make a contact print:

1. Position the enlarger housing near the top of its post, so it projects a wide circle of light when turned on. The aperture setting is optional; start with f8.
2. Place a fresh sheet of 8" x 10" printing paper, emulsion side up at the base of the enlarger. (remember how to tell emulsion if you cannot tell from sight- get a finger tip wet, the sticky side will be the emulsion side). Do not use an easel.
3. Position several strips of negatives emulsion side down in rows on the paper.
4. Gently lower a clean sheet of glass over both the negatives and paper to hold them flat and tight together.
5. Turn on the enlarger for a predetermined period of time. Try f 8 at 8 seconds. Aim for a good "overall" exposure as some negatives will print light, and others too dark.
6. Once exposed, process the contact sheet like we did with the photograms, or any other print. If the contact is too dark, lessen the exposure, conversely if it is too light, increase the exposure time.

Understanding the Negative

negative image is a total inversion of a positive image, in which light areas appear dark and vice versa. When picking an image to print, look at the negative. From the bracketing assignment you should have an idea of what different exposures can look like in negative form. We want you to print from negatives with the most "information" available. A negative that is very dark and opaque is referred to as being "thick" which means it has lots of information and may have been over exposed, over developed or both. A negative that is very transparent is referred to as being "thin" meaning it does not have very much information from being under exposed, underdeveloped or both. The best negatives have all the information there so you can choose what you would like to make viewable. If you bracketed and the negative which had the most information was not at the "normal" light meter reading you should adjust your ISO (film speed to reflect this) 


For example:


If you shot 3 frames with an ISO of 400. The first frame was exactly as the meter read, the second was under and the third was over (each by a stop)), we would look to see which negative had the most available information. If your first negative from each image was it, keep shooting at an ISO of 400. If your second image was underexposed by a stop and looked the best, keep using 400 speed film, but make your ISO setting read 200. This acts similarly to halving a stop or underexposing by a stop. Alternatively, if your third frame was over exposed by a stop and looked the best, you would continue to use 400 speed film but set your ISO and set your camera settings to the normal meter readings with the new ISO.

Getting Ready to Enlarge

The negative is positioned in a negative carrier, which fits into the enlarger below the condenser or diffuser. most carriers are two pieces of metal or plastic that hold negatives flat and in place. The carrier has a cut-out the size and format of a negative.
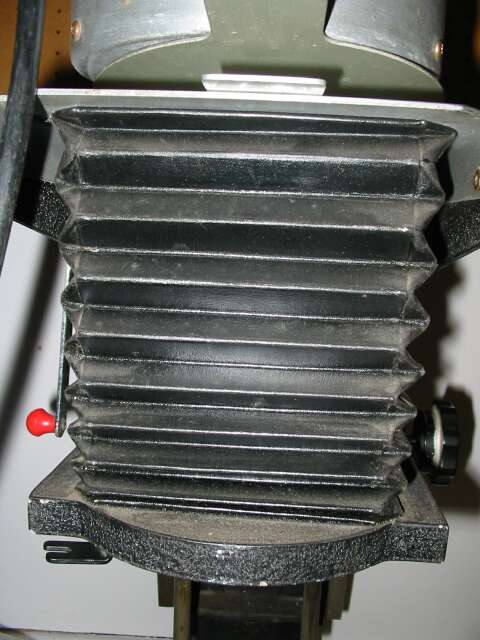
A Bellows is located under the negative carrier. It is used to focus the image. As the bellows is expanded or contracted, the lens moves closer to or farther from the baseboard until the image is sharp.
As the enlarger housing is moved up the post away from the baseboard, the projected image size is increased. As it moves down, the image becomes smaller.

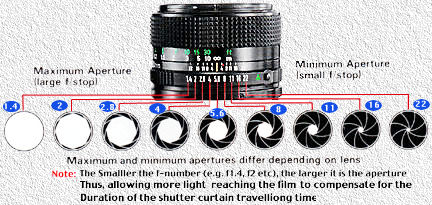
Enlarging lens. An enlarging lens works somewhat like a camera lens to focus the image and control the light. The lens must be matched to the size of the negative being enlarged. All camera and enlarging lenses have a certain covering power, that is , the amount of even illumination that a lens projects. Like camera lenses, enlarging lenses are classified according to their maximum aperture. An f 4 enlarging lens allows more light through it than an f 5.6 enlarging lens. More light means the the images will be easier to see and focus.

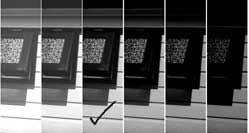
Focusing magnifier or grain finder. A focus magnifier enlarges the projected image to facilitate more accurate focusing. The image can be focused without a magnifier, but the results are less likely to be sharp. A grain finder enlarges the grain patterns of the projected negative, allowing even easier accurate focusing.


Easel. An easel holds printing paper flat and in place under the enlarger. It consists of two parts: a base on which the paper is laid and positioned, and a hinged top piece with a crossing metal "blades" to hold the paper flat. The desired image size of the print is set by adjusting the metal blades along a ruled molding on the edges of the top piece of the easel.


Making a print requires a variety of judgements and interpretations, much more so than when developing a roll of film. What follows are the basic printing steps, along with discussion of some of the judgement areas.

Setting Up The Negative

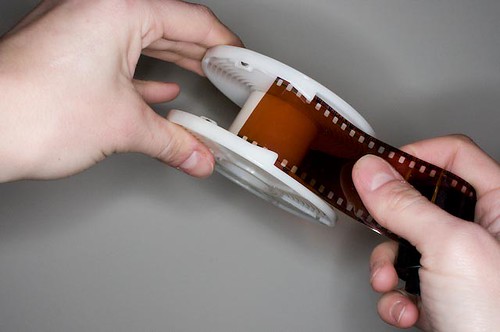
1. Put a strip of negatives in the negative carrier, with the negative to be printed framed by the cut-out section. The negative needs to be positioned with its emulsion side (the dull/matt surface) down (shiny side up!) or the print will have the wrong orientation- basically, it'll be backwards.
2. Use a blower or brush to remove dust that might have accumulated on either side of the negative.
3. Close the carrier, and fit it tightly in place in the enlarger housing.
4. Set the easel for the approximate images size for the print. the image size is the size of the printing paper minus the borders. For example, a 7.5" x 9.5" size image on an 8" x 10" sheet of paper has a 1/4" border all around. The easel has size scales on it's top and sides for setting the image size.
5. Place the easel on the base of the enlarger.
6. Turn on the safe lights, and turn off the room lights.
7. Turn on the enlarger. The enlarger will project the negative image down to the easel.
8. Open the aperture of the enlarging lens to its widest f-stop in order to project enough light to see the image clearly. Now the size of the image must be set and the negative focused.
9. To set the image size, move the enlarger housing up and down on its post. The position of the easel on the enlarger base will need to be adjusted until the projected image is framed tightly by the easel blades. As the housing moves up the post, the projected image becomes larger; as it moves down, the image becomes smaller. Once the desired image size is set, lock the housing in place on the enlarger post.
10. Once the image size is set, focus the negative by turning the focusing knob to expand tor contract the bellows. The image size will need minor adjustment at this point, and the easel may need to be moved around. Adjust the size first, then the focus and easel location. Keep readjusting until the projected image is the correct size and in focus. Make sure to use a piece of the paper you are printing on to focus on as the slightest  distance change will affect the critical focus.

Making a Test Strip

A test strip is a section of printing paper with several different exposures made from a single negative. It is simple to make and can save much time and money on wasted printing paper and chemicals.
To make a test strip:
1. Close down the lens aperture from it's wide-open position. Any f-stop can be used for printing, but the middle stop f 8 is a good starting point.
2. Take out a sheet of printing paper from its box. When opening the box make sure that no light other than safelight hits the paper. Lights from mobile phones, ipods, other people enlarging, enlarger light leaking from the negative area are all problematic. Make sure to close your box and keep your paper safe.
3. Cut the sheet of printing paper into 9 smaller rectangles. Only one will be needed, place the rest back in the box right away for future tests.
4. Lay the strip of paper in the easel, emulsion (shiny/sticky) side up. Figure out where the most important part of your image is, and with the most range of tonality, and try to place your test strip in that part of the frame.
5. Set your timer to 4 seconds. It is an arbitrary starting point as exposure times can vary widely.
6. Switch on the timer and expose the entire stripe for 4 seconds.
7. Change your timer to 2 seconds.
8. Use and opaque piece of cardboard to cover a bottom segment of paper.
9. Switch on the timer and expose the uncovered area of the strip for that time. If the timer is not properly functioning use the second hand of the clock in the darkroom, and switch the enlarger on and off manually. This will work, but it will provide less consistent exposure times than an enlarging timer.
8. Move the cardboard, taking care not to move the strip of paper or the easel along with it. Leave another part of the paper uncovered and expose this.
9. Move the cardboard and repeat the exposure process until there is no more paper left. Previously exposed sections will continue to receive additional amounts of exposure.

Viewing the Test Strip

Now the test strip has a latent image with different exposure times starting at 4 seconds, 6, 8, 10, and so on. Once developed, the test strip should provide a good guide to the required print exposure for that particular negative.
The finished test strip will have a range of exposures; some may be light and some dark. If all exposures are too light or too dark, make another test strip. The ideal strip is dark on one end and light on the other.
If the entire strip is too dark, cut back the exposure. Either close down the lens- try f 11.
If the test strip is too light, increase the exposure, open the lens to f 5.6
* Once we begin using fibre paper, the prints will have a "dry-down" affect. Which means the prints will darken when they have dried. This is not the case with gross RC paper.
If you find that a strip of 10 seconds looks a little light and your strip of 12 seconds is a little dark, set your timer to print at 11 seconds and your image should come out looking the way you want.
If you have a strip that looks good but has an exposure time of less than 8 seconds close down the lens by a stop and double the time:
ex: an exposure of 5 seconds at f 8 would be better if it were 10 seconds at f 11 (this will be explained in further detail next week when we deal with burning and dodging). Alternatively, if there is a very long exposure, lets say 24 seconds at f 8, open up your enlarging lens one stop and halve the time;12 seconds at f 5.6.

Once you have determined the correct exposure settings, it's time to make a print!
.

Thursday, November 18, 2010

Week 2 Assignment Due week 3

What you will need to bring for class:
your camera
2 rolls of film, exposed and developed (one from the first assignment and one from the second)
a box of FIBER PAPER
Negative preservers
A notebook
a pencil
For those of you who still owe £- this is your last chance!!!

Some of you need to make up the assignment from last week, we expect this to be done (exposed and developed) as well as this week's assignment for Wed.

Assignment:

Expose 1 roll of film; HP5 36 exp. of whatever subjects you would like in daylight.
Note all camera settings for each exposure.

After exposure develop this film. Give yourself enough time so it is dry before next class. Do not wait until Wed afternoon.

Cut film strip into segments of 5 frames and put in your negative preservers. Bring all negatives to class

Week 2. Notes

Film Development Preparation:

You will need; a can opener, scissors, a "light tight" darkroom, developing tank, a graduated cylendar or beaker, film developer, stop, fixer, photo-flo (wetting agent) water with a way to control temperature, a timer or clock, clothes pins, and negative preservers.


"Spooling" film

The hardest part of the film-developing process can be loading the film onto the spiral developing reel. Once loaded, the reel is placed in a processing tank, and the chemical solutions poured in and out until the film is fully processed. 
The reel is used to guarantee that the chemical solutions reach all the parts of the film evenly. When properly positioned on the reel, no section of the film touches any other section. The film must be loaded onto the reel in total darkness since it is sensitive to light. We practiced this in class. The steps for loading film onto a reel are as follows:

1. Remove the protective cover. For 35mm film use a can opener to pry open the flat end of the metal cassette. (the other end has a spool sticking out of it and is more difficult to pry open.) Then pull the film out of the cassette and discard the the cassette. The film is wound tightly on a spool, so tends unralvel quickly. Try to prevent this from happening. 
2. Cut the leader. The loading process requires that the end of the film be straight. At the beginning of a roll of 35mm film there is a curved leader that must be cut off with scissors before the film can be loaded onto the reel. Try to keep the edge as straight as possible. 
3. Roll the film onto the reel. This procedure varies with the type of reel used. The aim is to lay the film into the grooves of the spiral so that no part of the film touches any other part of the film. Touching sections will not develop fully. With the plastic reels we have in the darkroom you will need to feel for the large end of the "L" shaped nibs on the reel. The wide flat end is the side which should be held towards you. Line the sides up to allow the film to enter the grooves. Slide the film into the plastic grooves and under the ball bearings located at the outer edge of the spiral. Then turn the reel back and fourth with both hands and the film will "catch" and move forward. The reel picks up the film, and loads almost automatically. 
Work slow and steadily. Do not try to rush the laoding process. Also make sure the reel is completely dry before loading. Wet reels are difficult to load. It is easy to tell, even in the dark, when something goes wrong. The film will move unsmoothly to one side or another or it will bend too much. An edge of the film may crinkle and cause the film to jump a groove or it might just not move at all. If it feels wrong, do not continue loading. It will likely exacerbate the situation. Stop, unwind the film, and try again. 
4. Cut off the end. Once the loading is completed, the film must be cut off from it's spool. It is help on the spool by a piece of tape. Take a pair of scissors, and make the cut as close to the spool as possible. 
5. Place the reel in the tank. Make sure to put the cover on tightly. You should hear a loud clicking sound and feel the lid lock into place. Test this by inverting the tank with your hand underneath it, and shake it to ensure your lid will not fall off. 

*The room lights can now be turned on, and the developing process started. 


Anatomy of film development tank

Light-tight tank with spiral reel inside. The film is loaded onto the reel in the dark and placed in the tank. The lights can then be turned back on. Chemicals are poured into the top of the tank, which has a light trap to allow liquids in and keep light out. Light cannot "turn corners". 

Processing Film

Chemical solutions are poured in and out of the processing tank in the following order: developer, stop bath, and fixer. The processed film is then washed, preferably with a fixer remover and a short water rinse. Finally, the film is treated with a wetting agent and hung up to dry. MAKE SURE VENTILLATION IS ON.

The process has been printed out and hung on the wall of the darkroom for reference. 

1. Set up enough water at the correct temperature (20 C) for your prewash and for the 1 part water you will add to the developer.
2. Pour water into tank for prewash
3. Make developer solution, make sure temperature is correct - remember it's cold down there, so the developer is going to be cold. A few degrees off can cause a significant difference in your negatives.
4. Pour prewash down drain and replace with developer.
5. Pour developer down drain and replace with stop
6. Return stop to tank and replace with fixer
6. Use 2 drops of HYPO CHECK in fixer look for a "milky" reaction which will swirl downwards. If this is      not present return fixer to tank. In the even that the fixer has gone off, pour the fixer into container labeled "exhausted fixer" which can be found under the sink.
7. Wash film
8. Wetting Agent - photoflo
9. Hang negatives to dry
10. RINSE and DRY tanks and surfaces.
11. When film is dry cut into segments of frames of 5 and file into negative preservers. 
12. Mark down in darkroom log your name, how many rolls of film you processed and the date. 
13. Make sure you have cleaned everything and put it back where it belongs.


Enlarger Anatomy

Enlargers can be formidable in appearance, but are simple to operate. A long post holds the enlarger housing, which in turn holds a light bulb, condenser, negative carrier, bellows, and a lens. At its bottom, the post is attached to a baseboard.
An enlarger makes prints of different varieties: photograms, contact prints and emlargments. (the latter two of the three we will discuss and work on in Week 3)
For the time being we want you to think about the photograms you made, as these are not very different from the contact sheets you will make.
*For right now we would like to remind that an enlarger lens aperture should be f 8 and a time of 8 seconds. 

What is a "Photogram?"

photogram is a photographic image made without a camera by placing objects directly onto the surface of a photo-sensitive material such as photographic paper and then exposing it to light. The result is a negative shadow image varying in tone, depending on the transparency of the objects used. Areas of the paper that have received no light appear white; those exposed through transparent or semi-transparent objects appear grey.


Print Development

Processing chemicals for prints are basically the same as those used for processing film. The one exception is the developer. Film and paper developer perform the same function (developing the latent image), but their chemical composition is slightly different so it is necessary to have separate film and paper developers. Stop bath, fixer (and fixer remover) are all the same for film and paper. The dilutions for film and paper developers are different as well, so please remember to consult the labels if you are not clear. 
Set up four trays for the printing process. Position the trays in a line, and work in the direction which leads to the sink or water source. In forests darkroom we will be doing the reverse of the diagram below starting our developer on the right and working to the left. The trays should be filled 1/4 to 1/2 full depending on how much you are planing to print during that specific session. 


Paper Development Process

The work flow is very similar to film development. We have printed the specifics of the work flow for you to consult and hung on the wall above the counter. MAKE SURE VENTILATION IS ON.

1. Set up trays
2. dilute developer accordingly and fill the rest of the trays appropriately.
3. turn on safe light and off overhead lights.
4. Make exposure
5. place print in developer, remember to make sure print is completely covered with chemistry and agitate every 15 seconds or so.
6. remove print from developer, hang at an angle over tray and allow excess chemistry to drain off print. This will decrease the amount of chemicals mixing, and extend the life of the chemicals.
7. DO NOT MIX THE TONGS. This is a hard habit to learn. Drop your print into the next bath, you do not need to place it it. If you do put the tongs from the previous bath in the next- RINSE THEM IMMEDIATELY so as to ensure you do not put them back in the first bath. 
8. Stop bath remember about the TONGS
9. Fixer, remember about the TONGS
10. wash
11. When printing session is completed, place prints in final wash. You can turn safe lights off and overhead back on.
12. Squeegee prints
13. Place prints face down on drying racks.
14. RINSE and DRY all trays and tools
15. Make everything has been put back. 

A Note on Washing Prints, Squeegee and Drying Racks.

Finished prints must be free of fixer, or they will deteriorate in time. If the squeegee or squeegee surface or drying racks get any chemistry on them- RINSE them! They can transfer these chemicals to your and anyone else's prints and destroy them. We do not want this. 
Fiber based papers (which is what we want you to use) absorb more fixer so need a much longer water wash, than RC (which is gross plastic and you shouldn't use.) We do not have fixer remover, so we will want your final wash to be 30min. long. Please plan your time around this. 
After your wash place your print face down on squeegee surface and run squeegee off the print smoothly to remove excess water. You may sqeegee both sides but be sure to be gentle with the front image side of your print to avoid scratching the emulsion. 
Take print to drying rack and place face down on the screen. Allow for prints to dry. In our darkroom this may take 12 or more hours due to temperature and humidity. 

Thursday, November 11, 2010

Week 1 Assignment Due Week 2

You must expose at least one roll of film (Ilford HP 5, 400 ISO 36 exp). The subject is entirely up to you, but you should photograph in daylight and bracket at each available f-stop on your lens

For every composition you create, you will make three exposures. 
THE APERTURE WILL REMAIN CONSISTENT, THE SHUTTER SPEED WILL CHANGE.
Write Down your camera settings for every exposure made


Example: Expose for the suggested meter reading, then make two more exposures, the first 1 stop more (twice as much light) and the second 1 stop less (half the light)
If the suggested meter reading for a scene is f 4 at 1/60

1st exposure: f4 at 1/60
2nd exposure: f4 at 1/30
3rd exposure: f4 at 1/125


36 exposures
Scene 1 
Frame 1. Aperture: f 2.8 (or the largest available aperture) Shutter Speed: suggested exposure from light meter when set to appropriate f stop and ISO
           2. Aperture: same as above Shutter Speed: One stop more than suggested exposure
           3. Aperture: same as above. Shutter Speed: One stop less than suggested exposure
                      *The camera position must remain the same through these exposures
Scene 2
Frame 4. Aperture: f 4 (or second largest aperture)  Shutter Speed: suggested exposure from light meter

           5. Aperture: same as above Shutter Speed: One stop more than suggested exposure
           6. Aperture: same as above. Shutter Speed: One stop less than suggested exposure
                       *The camera position must remain the same through these exposures
Scene 3
Frame 7. Aperture: f 5.6 (or the third largest available aperture) Shutter Speed: suggested exposure from light meter when set to appropriate f stop and ISO
           8. Aperture: same as above Shutter Speed: One stop more than suggested exposure
           9. Aperture: same as above. Shutter Speed: One stop less than suggested exposure
                       *The camera position must remain the same through these exposures

***Continue this process until you reach f22, or the smallest f-stop available

Any remaining shots are free for experimentation.

Week 1. Notes

We covered Darkroom inductions and protocol- there is a copy of this on the door of the darkroom

The Film: How Light Affects Film

Photographic film consists of a transparent plastic base, that holds a light sensitive emulsion. The emulsion consists of gelatin and silver halide crystals (silver halide is a collective term for the combination of silver with a halogen element; such as bromine, choline, or iodine) The gelatin acts to primarily bind the crystals to the plastic base while the silver halide crystals trap light. Light acts like a glue to bind the crystals together. Upon exposure to light these crystals "clump" together. At first this change is invisible but during chemical development the silver clumping is converted into a buildup of visible black metallic silver, this is referred to as "density". Unexposed crystals are removed from the film in the chemical process. Different proportions of silver density make up the photographic image.

Loading and Advancing Film

Film is loaded for use through the rear of the camera or the camera back. Usually the back is on a hinge that swings open for loading. the film cassette or roll is loaded to one side of the camera back and stretched across the rear of the camera (with the dull or emulsion side of the film facing the lens) Directly over and flat up against a rectangular or square cut out hole onto a take up spool. The size and shape of this hole determine the film format; the hole is located between the lens and the film and allows a certain amount of the light that travels through the lens to strike the film. A 35mm camera has a rectangle hole the size of a 35 mm negative. Once the entire roll has been exposed the entire roll must be prepared for unloading.


The Single Lens Reflex Camera: SLR

SLR cameras allow viewing and focusing the subject directly through the lens. The photographer sees exactly what is recorded through the lens. Since the film is loaded directly behind the lens a complex mechanism is required to bypass the film and allow through the lens viewing. Light reflects off the subject, through the lens, off a mirror and upward to a ground glass. The image is focused on the ground glass by turning the lens. It is viewed by looking through an eye level viewer to a prism that reflects the image from the ground glass.

The Camera Lens

The camera lens controls four functions. Image focus, quantity of light reaching the film, images area, and depth of field of the image.  Focus refers to what is and is not "sharp".  Quantity of light is controlled by aperture. Light must pass through the lens opening or aperture to reach the film. It can be opened wide to allow more light in, or closed down to keep out light. The aperture size is critical to good film exposure. In general when photographing in low light a large aperture is required to allow enough light to reach the film. When photographing in bright light, a smaller aperture is needed to reduce the amount of light that is reaching the film. F Stop is a measurement of the size of the aperture opening. Common F Stops are:


The larger the F Stop number, the smaller the opening, the smaller the F Stop number the larger the opening. A lens set at F2 allows more light to pass through it than lens set at F16 for example.


Controlling depth of field
                                                                                                                                                                                                                          An example of this would be the following 2 photographs. In the top image the depth of field has been extended to ensure all of the chain-link fence is in focus. This is done with a small aperture such as f 16. Alternatively the selective focus in the bottom image has been created by opting for a large aperture such as f 5.6


Shutter Speeds

Every camera has a shutter. A shield located somewhere between the sheet of film and the lens. The shutter protects the film from light entering the lens. The photographer chooses when to make an exposure by pressing the shutter button. The shutter has two main functions: it sets the amount of time for which film is struck by light and it affects the amount movement rendered in the image.
The amount of time the shutter remains open is critical to the film exposure. A photographic image is created by light traveling through the lens, and falling onto the film. The amount of that light is controlled in part by the lens opening however light cannot actually reach the film until the shutter opens. Together these controls- aperture and shutter- are the key variables for good film exposure. Shutter speed must be set according to the prevailing light conditions. When the lighting is dim, a long or slow shutter speed is required; that is the shutter must remain open for a time long enough to allow a lot of light to reach the film. When the lighting is bright, a short or fast shutter speed is needed so that relatively little light reaches the film.
The relationship between the shutter speeds offered is essential to understanding exposure. Each setting doubles the time of the setting on one side of it, and halves the time of the setting on the other side. "4"( 1/4 of a second) represents half as much time so allows half as much light to reach the film as "2" (1/2 of a second).

ISO/ASA (Film Speed)

Film Speed refers to the sensitivity of film to light. "Fast" films (eg. 3200 ISO or speed) receive and record light more readily than "slow" films (eg. 100 ISO or speed)

Light Meters
an example of a hand held light meter

A light meter measures light and translates that measurement into a workable set of F Stop and Shutter speed combinations, appropriate to the lighting conditions of the subject. SLRs commonly have internal light meters. However, one can or may need a hand held light meter. In such a circumstance one would set the ISO to their respective film and (for our purposes) indicate the lighting situation as Daylight. When using the SLR light meter make sure the ISO setting is correct before making initial exposures (generally done immediately after loading a roll of film.)

one possibility of in camera light meter reading proper exposure


  one possibility of  in camera light meter reading 1 stop under exposed


Sunny 16/ Overcast 8


In photography, the Sunny 16 rule (also known as the Sunny f/16 rule) is a method of estimating correct daylight exposures without a light meter. Apart from the obvious advantage of independence from a light meter, the Sunny 16 rule can also aid in achieving correct exposure of difficult subjects. As the rule is based on incident light, rather than reflected light as with most camera light meters, very bright or very dark subjects are compensated for. The rule serves as a mnemonic for the camera settings obtained on a sunny day using the exposure value (EV) system.
The basic rule is, "On a sunny day set aperture to f/16 and shutter speed to the [reciprocal of the] ISO film speed [or ISO setting]." For example:
  • On a sunny day and with ISO 100 film / setting in the camera, one sets the aperture to f/16 and the shutter speed to 1/100 or 1/125 second (on most cameras 1/125 second is the available setting nearest to 1/100 second).
  • On a sunny day with ISO 200 film / setting and aperture at f/16, set shutter speed to 1/200 or 1/250.
  • On a sunny day with ISO 400 film / setting and aperture at f/16, set shutter speed to 1/400 or 1/500.
As with other light readings, shutter speed can be changed as long as the f-number is altered to compensate, e.g. 1/250 second at f/11 gives equivalent exposure to 1/125 second at f/16.
An elaborated form of the Sunny 16 rule is to set shutter speed nearest to the reciprocal of the ISO film speed / setting and f-number according to this table:
ApertureLighting ConditionsShadow Detail
f/22Snow/SandDark with sharp edges
f/16SunnyDistinct
f/11Slight OvercastSoft around edges
f/8OvercastBarely visible
f/5.6Heavy OvercastNo shadows
f/4Open Shade/SunsetNo shadows
Add One StopBack lightingn/a


Bracketing 

Bracketing means taking exposures of either side of the recommendations of the light meter. It is a safe way to guarantee good exposure. If the recommended F Stop and Shutter speed combination is F 8 at 1/60 take an exposure at that setting, but also take an exposure allowing twice as much light to reach the film - F 5.6 at 1/60 or F 8 at 1/30 - and an exposure allowing half as much light - F 11 at 1/60 or F 8 at 1/125.

****************************************************************************
A Great reference book, if you decide you need more information.


Syllabus

Intro to Photography
Black and White Darkroom

first come first serve sign up:


Objective

To offer an introductory class in black and white photography over the course of eight weeks, with an exhibition of student work at the end of the course. By the end of the class students should be comfortable using a 35mm camera, loading, exposing and processing black and white film, handling chemistry, using an enlarger and controlling the exposure and contrast of their prints. Successful work will require out of workshop time to take pictures and make prints. Classes will be spent covering the aforementioned information in addition to a brief history of the medium, having group critiques and preparing work for an exhibition.

Timeline

Week 1: Introduction to the darkroom: safety, materials and chemistry, using a 35mm
Camera.
Week 2: Processing Film
Week 3: Introduction to the enlargers; photograms and contact sheets. Overview of establish
photographers
Week 4: Using the Enlarger; Printing, Individual Meetings throughout the class after
Demonstration
Week 5: Critique, looking at work of establishes photographers
Week 6: Work Day; troubleshooting, enlarging continued
Week 7: Work Day. Group discussion concerning exhibition, and methods of presentation
Week 8: In Class Printing time/help. Curate exhibition as a group

* Assignments will be given each class, and students are expected to shoot at least one roll of film a week, more is strongly encouraged

Materials Required (Provided by Students)
Camera: 35mm SLR (preferred), however we will work within limitations or alternative cameras/formats
Film: Ilford HP5 is strongly recommended; and will be made available to purchase off of a bulk roll if interest is expressed a minimum of one week prior to the beginning of the course. Students will need at least 8 rolls of film.
Paper: Ilford MGIV VC FB 8x10 in 100 sheet is recommended
Negative Preservers
Binder and Notebook
Towel

All film and paper process and developement chemistry will be provided.