Film Development Preparation:
You will need; a can opener, scissors, a "light tight" darkroom, developing tank, a graduated cylendar or beaker, film developer, stop, fixer, photo-flo (wetting agent) water with a way to control temperature, a timer or clock, clothes pins, and negative preservers.

"Spooling" film
The hardest part of the film-developing process can be loading the film onto the spiral developing reel. Once loaded, the reel is placed in a processing tank, and the chemical solutions poured in and out until the film is fully processed.
The reel is used to guarantee that the chemical solutions reach all the parts of the film evenly. When properly positioned on the reel, no section of the film touches any other section. The film must be loaded onto the reel in total darkness since it is sensitive to light. We practiced this in class. The steps for loading film onto a reel are as follows:
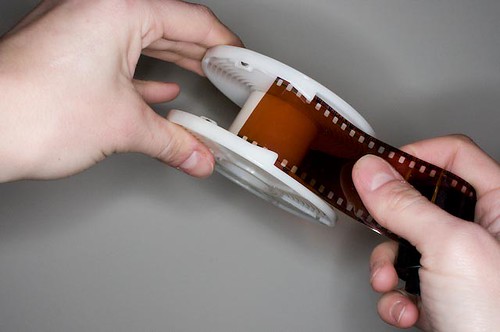
1. Remove the protective cover. For 35mm film use a can opener to pry open the flat end of the metal cassette. (the other end has a spool sticking out of it and is more difficult to pry open.) Then pull the film out of the cassette and discard the the cassette. The film is wound tightly on a spool, so tends unralvel quickly. Try to prevent this from happening.
2. Cut the leader. The loading process requires that the end of the film be straight. At the beginning of a roll of 35mm film there is a curved leader that must be cut off with scissors before the film can be loaded onto the reel. Try to keep the edge as straight as possible.
3. Roll the film onto the reel. This procedure varies with the type of reel used. The aim is to lay the film into the grooves of the spiral so that no part of the film touches any other part of the film. Touching sections will not develop fully. With the plastic reels we have in the darkroom you will need to feel for the large end of the "L" shaped nibs on the reel. The wide flat end is the side which should be held towards you. Line the sides up to allow the film to enter the grooves. Slide the film into the plastic grooves and under the ball bearings located at the outer edge of the spiral. Then turn the reel back and fourth with both hands and the film will "catch" and move forward. The reel picks up the film, and loads almost automatically.
Work slow and steadily. Do not try to rush the laoding process. Also make sure the reel is completely dry before loading. Wet reels are difficult to load. It is easy to tell, even in the dark, when something goes wrong. The film will move unsmoothly to one side or another or it will bend too much. An edge of the film may crinkle and cause the film to jump a groove or it might just not move at all. If it feels wrong, do not continue loading. It will likely exacerbate the situation. Stop, unwind the film, and try again.
4. Cut off the end. Once the loading is completed, the film must be cut off from it's spool. It is help on the spool by a piece of tape. Take a pair of scissors, and make the cut as close to the spool as possible.
5. Place the reel in the tank. Make sure to put the cover on tightly. You should hear a loud clicking sound and feel the lid lock into place. Test this by inverting the tank with your hand underneath it, and shake it to ensure your lid will not fall off.
*The room lights can now be turned on, and the developing process started.
Anatomy of film development tank
Light-tight tank with spiral reel inside. The film is loaded onto the reel in the dark and placed in the tank. The lights can then be turned back on. Chemicals are poured into the top of the tank, which has a light trap to allow liquids in and keep light out. Light cannot "turn corners".

Processing Film
Chemical solutions are poured in and out of the processing tank in the following order: developer, stop bath, and fixer. The processed film is then washed, preferably with a fixer remover and a short water rinse. Finally, the film is treated with a wetting agent and hung up to dry. MAKE SURE VENTILLATION IS ON.
The process has been printed out and hung on the wall of the darkroom for reference.
1. Set up enough water at the correct temperature (20 C) for your prewash and for the 1 part water you will add to the developer.
2. Pour water into tank for prewash
3. Make developer solution, make sure temperature is correct - remember it's cold down there, so the developer is going to be cold. A few degrees off can cause a significant difference in your negatives.
4. Pour prewash down drain and replace with developer.
5. Pour developer down drain and replace with stop
6. Return stop to tank and replace with fixer
6. Use 2 drops of HYPO CHECK in fixer look for a "milky" reaction which will swirl downwards. If this is not present return fixer to tank. In the even that the fixer has gone off, pour the fixer into container labeled "exhausted fixer" which can be found under the sink.
7. Wash film
8. Wetting Agent - photoflo
9. Hang negatives to dry
10. RINSE and DRY tanks and surfaces.
11. When film is dry cut into segments of frames of 5 and file into negative preservers.
12. Mark down in darkroom log your name, how many rolls of film you processed and the date.
13. Make sure you have cleaned everything and put it back where it belongs.

Enlarger Anatomy
Enlargers can be formidable in appearance, but are simple to operate. A long post holds the enlarger housing, which in turn holds a light bulb, condenser, negative carrier, bellows, and a lens. At its bottom, the post is attached to a baseboard.
An enlarger makes prints of different varieties: photograms, contact prints and emlargments. (the latter two of the three we will discuss and work on in Week 3)
For the time being we want you to think about the photograms you made, as these are not very different from the contact sheets you will make.
*For right now we would like to remind that an enlarger lens aperture should be f 8 and a time of 8 seconds.

What is a "Photogram?"
A photogram is a photographic image made without a camera by placing objects directly onto the surface of a photo-sensitive material such as photographic paper and then exposing it to light. The result is a negative shadow image varying in tone, depending on the transparency of the objects used. Areas of the paper that have received no light appear white; those exposed through transparent or semi-transparent objects appear grey.
Print Development
Processing chemicals for prints are basically the same as those used for processing film. The one exception is the developer. Film and paper developer perform the same function (developing the latent image), but their chemical composition is slightly different so it is necessary to have separate film and paper developers. Stop bath, fixer (and fixer remover) are all the same for film and paper. The dilutions for film and paper developers are different as well, so please remember to consult the labels if you are not clear.
Set up four trays for the printing process. Position the trays in a line, and work in the direction which leads to the sink or water source. In forests darkroom we will be doing the reverse of the diagram below starting our developer on the right and working to the left. The trays should be filled 1/4 to 1/2 full depending on how much you are planing to print during that specific session.

Paper Development Process
The work flow is very similar to film development. We have printed the specifics of the work flow for you to consult and hung on the wall above the counter. MAKE SURE VENTILATION IS ON.
1. Set up trays
2. dilute developer accordingly and fill the rest of the trays appropriately.
3. turn on safe light and off overhead lights.
4. Make exposure
5. place print in developer, remember to make sure print is completely covered with chemistry and agitate every 15 seconds or so.
6. remove print from developer, hang at an angle over tray and allow excess chemistry to drain off print. This will decrease the amount of chemicals mixing, and extend the life of the chemicals.
7. DO NOT MIX THE TONGS. This is a hard habit to learn. Drop your print into the next bath, you do not need to place it it. If you do put the tongs from the previous bath in the next- RINSE THEM IMMEDIATELY so as to ensure you do not put them back in the first bath.
8. Stop bath remember about the TONGS
9. Fixer, remember about the TONGS
10. wash
11. When printing session is completed, place prints in final wash. You can turn safe lights off and overhead back on.
12. Squeegee prints
13. Place prints face down on drying racks.
14. RINSE and DRY all trays and tools
15. Make everything has been put back.
A Note on Washing Prints, Squeegee and Drying Racks.
Finished prints must be free of fixer, or they will deteriorate in time. If the squeegee or squeegee surface or drying racks get any chemistry on them- RINSE them! They can transfer these chemicals to your and anyone else's prints and destroy them. We do not want this.
Fiber based papers (which is what we want you to use) absorb more fixer so need a much longer water wash, than RC (which is gross plastic and you shouldn't use.) We do not have fixer remover, so we will want your final wash to be 30min. long. Please plan your time around this.
After your wash place your print face down on squeegee surface and run squeegee off the print smoothly to remove excess water. You may sqeegee both sides but be sure to be gentle with the front image side of your print to avoid scratching the emulsion.
Take print to drying rack and place face down on the screen. Allow for prints to dry. In our darkroom this may take 12 or more hours due to temperature and humidity.
No comments:
Post a Comment