The Film: How Light Affects Film
Photographic film consists of a transparent plastic base, that holds a light sensitive emulsion. The emulsion consists of gelatin and silver halide crystals (silver halide is a collective term for the combination of silver with a halogen element; such as bromine, choline, or iodine) The gelatin acts to primarily bind the crystals to the plastic base while the silver halide crystals trap light. Light acts like a glue to bind the crystals together. Upon exposure to light these crystals "clump" together. At first this change is invisible but during chemical development the silver clumping is converted into a buildup of visible black metallic silver, this is referred to as "density". Unexposed crystals are removed from the film in the chemical process. Different proportions of silver density make up the photographic image.
Loading and Advancing Film
Film is loaded for use through the rear of the camera or the camera back. Usually the back is on a hinge that swings open for loading. the film cassette or roll is loaded to one side of the camera back and stretched across the rear of the camera (with the dull or emulsion side of the film facing the lens) Directly over and flat up against a rectangular or square cut out hole onto a take up spool. The size and shape of this hole determine the film format; the hole is located between the lens and the film and allows a certain amount of the light that travels through the lens to strike the film. A 35mm camera has a rectangle hole the size of a 35 mm negative. Once the entire roll has been exposed the entire roll must be prepared for unloading.

The Single Lens Reflex Camera: SLR
SLR cameras allow viewing and focusing the subject directly through the lens. The photographer sees exactly what is recorded through the lens. Since the film is loaded directly behind the lens a complex mechanism is required to bypass the film and allow through the lens viewing. Light reflects off the subject, through the lens, off a mirror and upward to a ground glass. The image is focused on the ground glass by turning the lens. It is viewed by looking through an eye level viewer to a prism that reflects the image from the ground glass.
The Camera Lens
The camera lens controls four functions. Image focus, quantity of light reaching the film, images area, and depth of field of the image. Focus refers to what is and is not "sharp". Quantity of light is controlled by aperture. Light must pass through the lens opening or aperture to reach the film. It can be opened wide to allow more light in, or closed down to keep out light. The aperture size is critical to good film exposure. In general when photographing in low light a large aperture is required to allow enough light to reach the film. When photographing in bright light, a smaller aperture is needed to reduce the amount of light that is reaching the film. F Stop is a measurement of the size of the aperture opening. Common F Stops are:
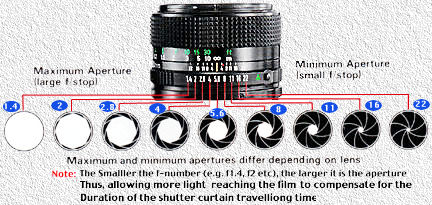
The larger the F Stop number, the smaller the opening, the smaller the F Stop number the larger the opening. A lens set at F2 allows more light to pass through it than lens set at F16 for example.
Controlling depth of field
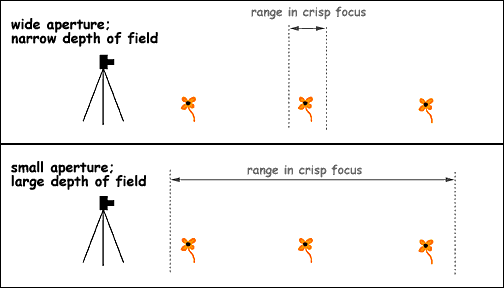
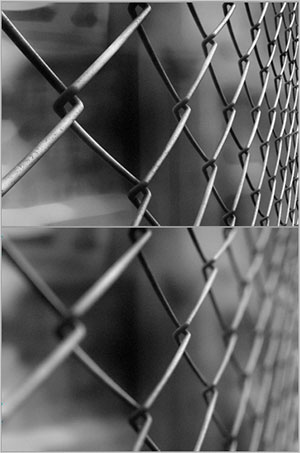 An example of this would be the following 2 photographs. In the top image the depth of field has been extended to ensure all of the chain-link fence is in focus. This is done with a small aperture such as f 16. Alternatively the selective focus in the bottom image has been created by opting for a large aperture such as f 5.6
Shutter Speeds
Every camera has a shutter. A shield located somewhere between the sheet of film and the lens. The shutter protects the film from light entering the lens. The photographer chooses when to make an exposure by pressing the shutter button. The shutter has two main functions: it sets the amount of time for which film is struck by light and it affects the amount movement rendered in the image.
The amount of time the shutter remains open is critical to the film exposure. A photographic image is created by light traveling through the lens, and falling onto the film. The amount of that light is controlled in part by the lens opening however light cannot actually reach the film until the shutter opens. Together these controls- aperture and shutter- are the key variables for good film exposure. Shutter speed must be set according to the prevailing light conditions. When the lighting is dim, a long or slow shutter speed is required; that is the shutter must remain open for a time long enough to allow a lot of light to reach the film. When the lighting is bright, a short or fast shutter speed is needed so that relatively little light reaches the film.
The relationship between the shutter speeds offered is essential to understanding exposure. Each setting doubles the time of the setting on one side of it, and halves the time of the setting on the other side. "4"( 1/4 of a second) represents half as much time so allows half as much light to reach the film as "2" (1/2 of a second).
ISO/ASA (Film Speed)
Film Speed refers to the sensitivity of film to light. "Fast" films (eg. 3200 ISO or speed) receive and record light more readily than "slow" films (eg. 100 ISO or speed)
Light Meters
 |
| an example of a hand held light meter |
A light meter measures light and translates that measurement into a workable set of F Stop and Shutter speed combinations, appropriate to the lighting conditions of the subject. SLRs commonly have internal light meters. However, one can or may need a hand held light meter. In such a circumstance one would set the ISO to their respective film and (for our purposes) indicate the lighting situation as Daylight. When using the SLR light meter make sure the ISO setting is correct before making initial exposures (generally done immediately after loading a roll of film.)
 |
| one possibility of in camera light meter reading proper exposure |
 |
| one possibility of in camera light meter reading 1 stop under exposed |
Sunny 16/ Overcast 8
In photography, the Sunny 16 rule (also known as the Sunny f/16 rule) is a method of estimating correct daylight exposures without a light meter. Apart from the obvious advantage of independence from a light meter, the Sunny 16 rule can also aid in achieving correct exposure of difficult subjects. As the rule is based on incident light, rather than reflected light as with most camera light meters, very bright or very dark subjects are compensated for. The rule serves as a mnemonic for the camera settings obtained on a sunny day using the exposure value (EV) system.
The basic rule is, "On a sunny day set aperture to f/16 and shutter speed to the [reciprocal of the] ISO film speed [or ISO setting]." For example:
- On a sunny day and with ISO 100 film / setting in the camera, one sets the aperture to f/16 and the shutter speed to 1/100 or 1/125 second (on most cameras 1/125 second is the available setting nearest to 1/100 second).
- On a sunny day with ISO 200 film / setting and aperture at f/16, set shutter speed to 1/200 or 1/250.
- On a sunny day with ISO 400 film / setting and aperture at f/16, set shutter speed to 1/400 or 1/500.
As with other light readings, shutter speed can be changed as long as the f-number is altered to compensate, e.g. 1/250 second at f/11 gives equivalent exposure to 1/125 second at f/16.
An elaborated form of the Sunny 16 rule is to set shutter speed nearest to the reciprocal of the ISO film speed / setting and f-number according to this table:
-
Aperture Lighting Conditions Shadow Detail f/22 Snow/Sand Dark with sharp edges f/16 Sunny Distinct f/11 Slight Overcast Soft around edges f/8 Overcast Barely visible f/5.6 Heavy Overcast No shadows f/4 Open Shade/Sunset No shadows Add One Stop Back lighting n/a
Bracketing
Bracketing means taking exposures of either side of the recommendations of the light meter. It is a safe way to guarantee good exposure. If the recommended F Stop and Shutter speed combination is F 8 at 1/60 take an exposure at that setting, but also take an exposure allowing twice as much light to reach the film - F 5.6 at 1/60 or F 8 at 1/30 - and an exposure allowing half as much light - F 11 at 1/60 or F 8 at 1/125.

****************************************************************************
 |
| A Great reference book, if you decide you need more information. |
No comments:
Post a Comment